
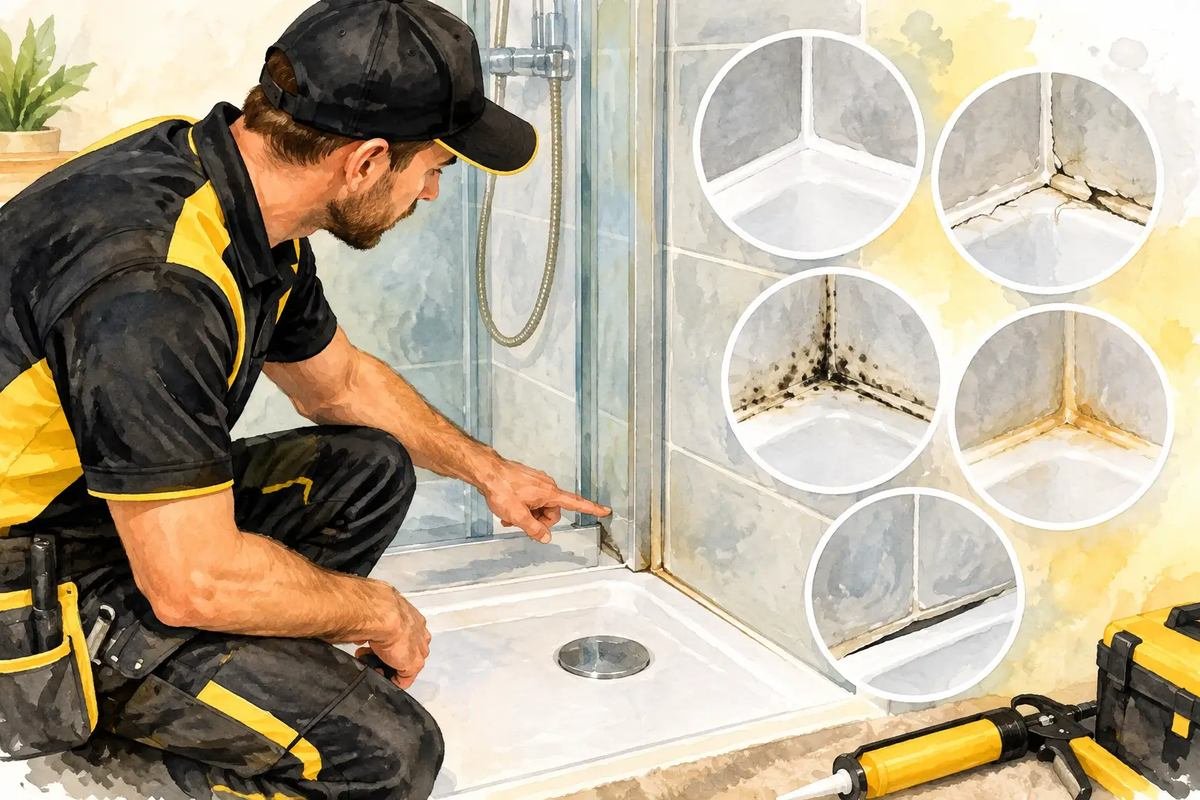
A dark line around the shower tray can look like a cleaning job. Sometimes it is. But if the sealant is splitting, lifting or staying mouldy after cleaning, water may already be finding its way behind the tray or wall panels. Knowing when to replace shower sealant helps you deal with a small maintenance job before it becomes damaged plasterboard, swollen flooring or a complaint from the flat below.
Shower sealant is not intended to last forever. It works hard: coping with heat, steam, cleaning products and the slight movement that happens every time somebody steps into the shower. A good reseal is usually straightforward, but only when the old sealant is fully removed and the area is properly prepared.
When to replace shower sealant
There is no fixed calendar date for replacing it. In a lightly used bathroom, a sound seal can last several years. In a busy family bathroom, a shower used every day may need attention sooner. Condition matters more than age.
Replace the sealant when it is no longer forming a clean, flexible, waterproof joint between the shower tray, bath or enclosure and the surrounding wall. The following signs are worth taking seriously.
1. The sealant has gaps, cracks or lifted edges
Run a finger along the sealant only if it is dry and clean. If you can see a split, a gap at a corner or an edge that has come away from the tile or tray, the seal has failed in that area. Water does not need a large opening to get through. Replacing a short broken section can be tempting, but patches often fail because the new material does not bond well to old, tired sealant. A full removal and reseal of the affected run generally gives a neater, more dependable result.
2. Black mould keeps returning
Surface mould is common in bathrooms with limited ventilation, and it does not always mean the sealant has failed. Try a suitable bathroom mould cleaner first, following the product instructions and ventilating the room.
If black marks are embedded within the sealant, or return quickly after cleaning, the material itself may be past saving. Silicone that has become stained through or started to break down is difficult to restore. Fresh sealant, combined with better drying and ventilation habits, is usually the sensible answer.
3. The sealant feels brittle, loose or rubbery
Healthy silicone has some flexibility. Old sealant can become hard and crack when the tray moves slightly. At the other end of the scale, poorly cured or unsuitable sealant may feel overly soft, tacky or loose from the surface.
Either condition means the joint is not doing its job reliably. Do not pull at it aggressively, as this can make a small problem worse. Plan a reseal before regular shower use sends water into the opening.
4. There are signs of water outside the shower
Damp patches, peeling paint on the adjacent wall, a musty smell, loose vinyl flooring or staining on a ceiling below are reasons to stop and investigate. The cause may be failed sealant, but it could also be a leaking waste connection, damaged grout, a door seal problem or water escaping from the enclosure.
This is the point where guessing can cost time. Dry the area, avoid using the shower if there is active leakage, and establish where the water is escaping before simply applying more silicone over the top.
5. Water sits in a corner after every shower
Water that regularly pools along the tray edge puts extra pressure on the sealant. It may be caused by the way the tray falls, the shower screen arrangement, an uneven surface or simply the direction of the shower head.
A reseal may still be needed, but it is worth addressing the reason for the pooling as well. Otherwise, even a neatly applied new bead may have a shorter life than it should.
6. The shower tray moves when you stand in it
A small amount of movement can open a sealant joint over time. If the tray flexes noticeably, or you hear creaking, the underlying support may need attention. Resealing alone without resolving significant movement is likely to be a short-term fix.
The same applies to a loose bath edge or wall panel. Sealant bridges a joint; it is not a structural adhesive or a cure for an unstable fitting.
7. The sealant was applied over old silicone
New silicone does not reliably stick to old silicone. A thick, uneven bead covering previous sealant might look acceptable at first, but it often traps dirt and can lift around the edges. If you have inherited a bathroom with several layers of sealant, it is normally time to strip it back and start properly.
What a proper shower reseal involves
The visible bead is the final part of the job, not the whole job. The old sealant needs to be cut out carefully without damaging the tray, tiles or wall panels. Remaining residue must be removed, then the joint cleaned and allowed to dry fully.
This drying stage matters. Applying silicone to a damp joint can prevent a proper bond and may lock moisture behind the new seal. The correct sanitary-grade silicone should then be applied in a continuous bead, shaped neatly and left to cure for the period stated by the manufacturer.
For a shower tray, it can also be necessary to fill the tray with water before sealing. This allows for normal settlement under load, reducing the chance of the seal pulling away later. It depends on the tray and how it is installed, but it is a useful detail that is often missed in rushed DIY repairs.
Can you reseal a shower yourself?
Yes, if the joint is accessible, the surfaces are in good condition and you are comfortable working patiently. The hard part is usually removing every trace of old silicone and keeping the area dry long enough before resealing. Applying a bead is easy; producing a tidy, watertight joint that lasts is the real test.
DIY is less suitable where there are signs of hidden damp, loose tiles, a moving tray, damaged wall boards or water appearing beyond the shower area. Those issues need checking before cosmetic work begins.
Avoid the common shortcut of adding fresh sealant on top of mouldy or detached silicone. It may improve the appearance for a few days, but it does not create a reliable bond. Also avoid using the shower too soon after resealing. Curing times vary, so follow the instructions on the product rather than taking a chance.
How to make new sealant last longer
Good bathroom habits make a real difference. Use an extractor fan during showers and for a while afterwards where possible. Open a window if that is practical and safe, wipe down pooled water from tray edges, and clean the sealant gently rather than attacking it with abrasive pads.
Keep an eye on enclosure door seals too. Water escaping through a worn screen seal can mimic a failed tray sealant joint. Catching it early can save a larger clean-up later.
For landlords and property managers, a quick visual check between tenancies is worthwhile. Tenants may report mould, but they may not notice a fine split at the back of the tray until damp has spread. Clear photographs before and after any repair also make maintenance records easier to manage.
When it is worth calling someone in
If it is simply time for a clean, careful reseal, this can often sit alongside other bathroom maintenance tasks. If there is evidence of damp or movement, allow time to identify and deal with the cause first. No judgement, no drama - just avoid covering up a problem that needs more than fresh silicone.
For householders in Swindon with a list of smaller repairs, Handyman Plus Van can help assess practical bathroom maintenance work within a planned visit. Sharing a few clear photographs of the shower edge, the corners and any nearby damp marks beforehand helps make the visit more productive.
A clean bead of sealant is a small detail, but it protects some of the most vulnerable surfaces in the home. If yours is cracked, lifting or repeatedly going black, dealing with it now is usually far easier than waiting for the water to announce itself elsewhere.
Want to book?
I'm a one-man handyman service in Swindon — insured, DBS checked, and rated 4.9 on Google. 3-hour sessions cover Swindon (town); full days cover about 30 minutes around Swindon.
Book a session, or message me free on WhatsApp on 07729 689420. If you'd rather talk it through first, you can book a paid 20-minute video call.
